How to Reconcile Accounts in QuickBooks Online: A Step-by-Step Guide
Introduction
Reconciling accounts in QuickBooks Online is one of the most critical bookkeeping tasks for maintaining accurate financial records. It ensures that your QuickBooks balance matches your actual bank or credit card statement, helping identify missing transactions, duplicate entries, or bank errors. Whether you’re a small business owner, accountant, or bookkeeper, understanding how to perform a proper reconciliation can prevent costly mistakes and ensure financial integrity.
This guide walks you through the entire QuickBooks Online reconciliation process, including how to fix discrepancies and tips to make the process faster and more reliable.
What Is Bank Reconciliation in QuickBooks Online?
Bank reconciliation is the process of comparing your QuickBooks transactions against your actual bank or credit card statements to confirm that both records match. It helps you verify that:
-
All deposits and withdrawals are recorded accurately.
-
There are no unauthorized or duplicate transactions.
-
Your books reflect your true financial position.
In QuickBooks Online, the Reconcile feature automates much of this process by allowing you to match your bank feed transactions directly with those recorded in your books.
Why Regular Reconciliation Matters
Reconciling your accounts monthly has several advantages:
-
Accuracy: Ensures your financial statements are correct and reliable.
-
Fraud Detection: Helps you spot unauthorized or unusual transactions quickly.
-
Tax Readiness: Makes year-end tax preparation smoother.
-
Cash Flow Management: Keeps your available cash balance up-to-date.
Inaccurate reconciliations can lead to serious problems such as overstated income, incorrect reports, or IRS issues — making this task essential for every QuickBooks Online user.
Step-by-Step: How to Reconcile Accounts in QuickBooks Online
Step 1: Gather Your Bank Statement
Before starting, obtain the most recent bank or credit card statement you want to reconcile. You’ll need:
-
The statement ending date
-
The ending balance
-
Details of all deposits, payments, and fees for that period
Make sure all bank transactions for that month have been downloaded or entered into QuickBooks Online.
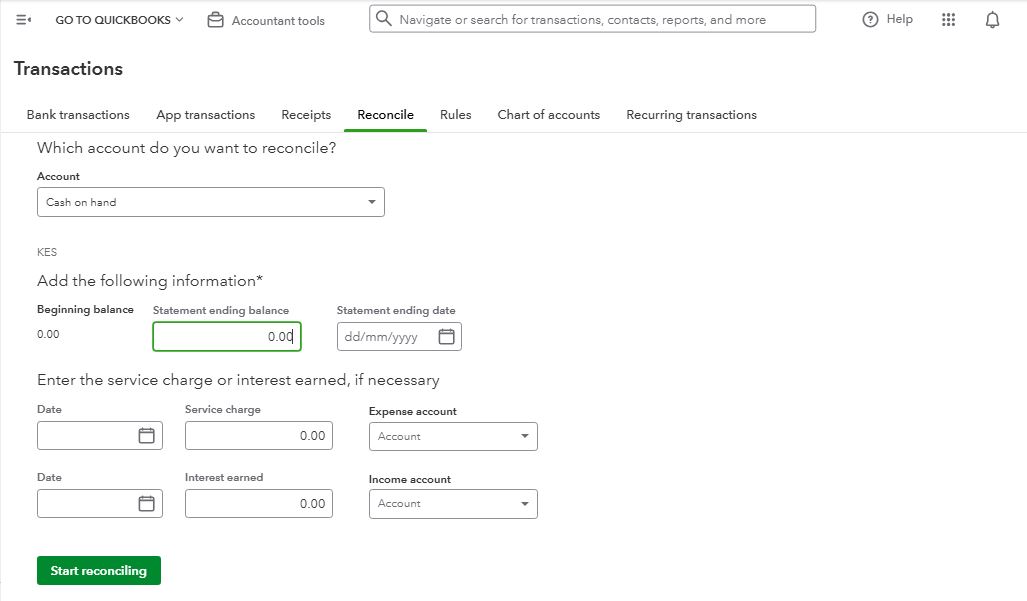
Step 2: Open the Reconciliation Tool
-
Log in to your QuickBooks Online account.
-
Navigate to the left-hand menu and select Settings ⚙️ → Reconcile.
-
Choose the account you wish to reconcile (e.g., Checking, Savings, Credit Card).
-
Enter the statement ending balance and ending date as shown on your bank statement.
Click Start reconciling.
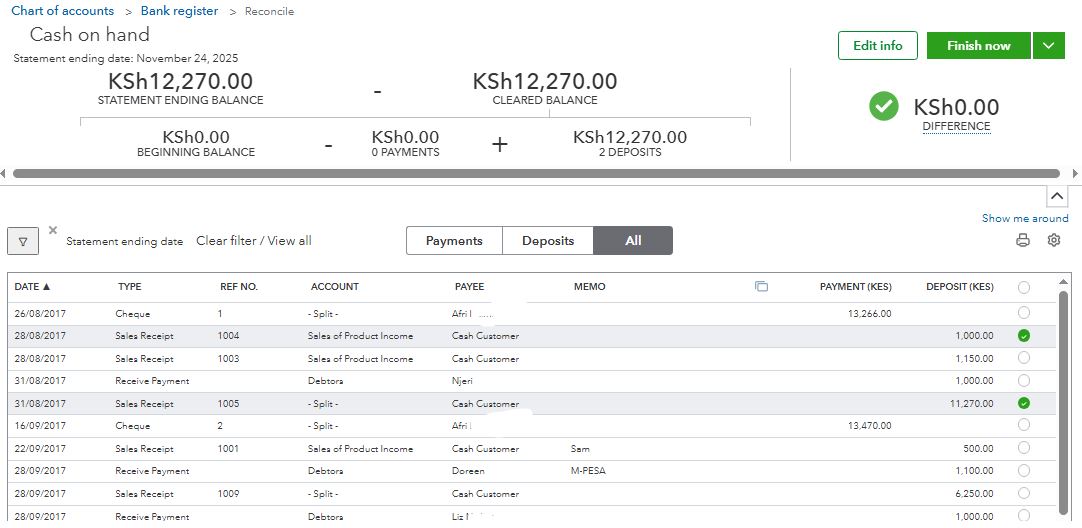
Step 3: Match Transactions
The Reconciliation screen will display two columns:
-
QuickBooks Transactions: All entries recorded in your books.
-
Bank Statement Transactions: The transactions from your actual statement.
Go line by line and check off each transaction that appears in both QuickBooks and your statement.
If you’ve connected your bank feed, many transactions will already be matched automatically. Verify their accuracy before confirming.
Step 4: Review Discrepancies
If your QuickBooks balance doesn’t match your bank statement balance, you’ll see a difference amount at the top of the screen.
Common causes of discrepancies include:
-
Missing or duplicate transactions
-
Incorrect dates or amounts
-
Outstanding checks not yet cleared
-
Bank fees or interest not recorded in QuickBooks
Use the “Find Match” and “Add Adjustment” tools to resolve issues. Only make manual adjustments if you’ve verified all other entries are correct.
Step 5: Complete the Reconciliation
Once the difference shows $0.00, your QuickBooks account matches the bank statement perfectly.
Click Finish Now to complete the reconciliation.
QuickBooks Online will generate a Reconciliation Report, summarizing all cleared and uncleared transactions. Save or print this report for your records — it’s essential for audits and tax filing.

How to Fix Reconciliation Errors
If you discover that previous reconciliations were incorrect, you can undo or fix them:
-
Go to Settings ⚙️ → Chart of Accounts → View Register.
-
Locate the transaction with the reconciliation “R” (reconciled) mark.
-
Click the R status until it’s blank to unreconcile it.
-
Re-run the reconciliation once you’ve corrected the error.
⚠️ Note: Only accountants with QuickBooks Online Accountant access can fully undo reconciliations. If you’re not one, contact your accountant or bookkeeping professional.
Best Practices for Smooth Reconciliation
To maintain accuracy and efficiency, follow these professional tips:
-
Reconcile Monthly: Always reconcile shortly after receiving each statement to avoid confusion.
-
Use Bank Feeds: Connect your bank accounts to QuickBooks Online to automatically import transactions.
-
Record Bank Charges: Enter all fees, interest, or adjustments before starting reconciliation.
-
Avoid Manual Duplicates: When adding transactions, check if they already exist in the bank feed.
-
Review Reports: After each reconciliation, analyze the report for unusual or old outstanding items.
-
Back Up Your Data: Although QuickBooks Online stores data in the cloud, export your reports monthly for added security.
Troubleshooting Common Reconciliation Issues
Here are some common issues users face — and how to fix them:
-
Opening Balance Doesn’t Match: Ensure your opening balance matches your previous reconciliation ending balance.
-
Transactions Missing: Check your date filters and import settings.
-
Old Transactions Still Uncleared: Contact your bank or verify if those payments were actually processed.
-
Accidental Deletions: Use the Audit Log (Settings → Audit Log) to track and restore deleted transactions.
Conclusion
Reconciling accounts in QuickBooks Online is not just a routine task — it’s a safeguard for financial accuracy and business integrity. By performing regular reconciliations, reviewing discrepancies carefully, and following best practices, you ensure your books remain clean, compliant, and ready for financial reporting at any time.
With QuickBooks Online’s powerful reconciliation tools, what used to take hours can now be completed in minutes. Consistency is key — make reconciliation a regular part of your monthly workflow, and your financial data will always be trustworthy and audit-ready
Leave a Reply: